Hey Ya'll (Paula D. accent - hehe).
I've been up since crazy early in the morning (5am) and it just might be because I'm excited about a few things. For starters, it's a long weekend and I get to spend an extra day with my hubby. YAY!! The other reasons are craft related, which I will get to soon enough.
First let me apologize for being absent for a bit. I've been very busy planning Giovanni's 1st birthday, creating things, buying things, selling things, eating things (lol), but the good news is that I've been taking photographs of everything to share with you.
I have a few Mickey inspired projects to show and once they are done I will surely blog some photos and videos of that, but for now I will share the one that's completed.
I saw a photo of something similar to what I made (on Pinterest, my new obsession; as if I need another online "social" "thing" to get addicted to). The photo was a topiary made of gum drops. So cute. It was made to look like Minnie Mouse and I thought I could recreate that by just using paint.

The toughest part about this project was having to pay for these very expensive styrofoam balls. WTH? And I used coupons!! Ugh!! I was considering making 2 of these topiaries, but I didn't want to pay $6 for another ball. Crazy, I know!! Anyway, the photos are self explanatory.


I later went back and repainted the pot with Craft Smart "Red" acrylic paint because it still looked "orange" to me. I couldn't help but be obsessed with getting the red just right. Hubby thought I was crazy, but you crafters understand me, don't you?

In the photo below I cut a 3" styrofoam circle in half and placed it inside the pot painting it red a bit to make sure no white shows through the green moss. I then added more crumbled paper around the "moat" edges to fill in gaps. And as always, everything was secured down with hot glue.

I was so excited about my creation that I just HAD to be in a photo with it. You can see how I get down and dirty with my projects. Did I go and put on makeup and get dressed up for the photo? No, this was done right after we came home from church. I was too excited to get comfy!
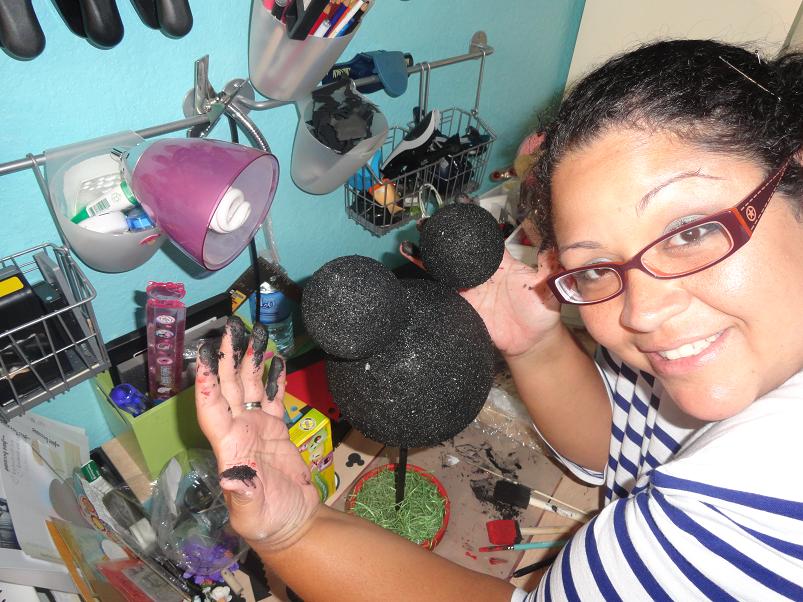
I did use hot glue, but I wanted to make sure these balls weren't going anywhere. The party is going to be outside in October and I don't know if it'll be a windy day. So I left the bamboo sticks I used to paint them and stuck them inside the big head. Plus, isn't that the way it should be? The black dowel ("body") was something I found in my craft room, lying around in between some magazines. I painted it black and shoved it in both styrofoam (top and bottom) balls. Later, I was looking around for something and found a bag of wooden dowels. Whatever that white one was for will just have to do without. LOL!!


To make the "buttons" I punched 6 oval white pieces using the Stampin Up small oval punch and just layered them on top of each other to appear sticking out. The first set of oval punches was painted over, this made it more "thick".

If you have any questions just check the video that should be attached below sometime this weekend, so come back for that if you wish.
Thanks for stopping by and have a wonderful Labor Day weekend!!
x0, Damaris


5 comments
Hi Demaris. I love this idea! You have done a great job, and your little one is going to just love it as well. I am so glad to see that you made it in time for my blog candy. Good luck! Hugs, Lisa
Damaris, this is so stinkin cute. I love it! You are such a sweet Mommy and Gio will have so much fun at his party, can't wait to see more, Hugz, Kim
Hey Damamris, So glad you visited my blog and liked the boy overalls. I will be posting the girl version tomorrow. So stop by and tell me what you think. BY the way your mickey topiary is beautiful.
For the overalls, go to the website and if they are not their, send Yeya an email. Also check out her laces, trims, bling and store products. They are wonderful.
Aw! It is so cute! Girl, you are so creative! Stopping by to show some love. Your blog is absolutely beautiful!
Hugs,
Elizabeth
Super cool! I love how it came out :)
Post a Comment